Making a 3D House Model

This is Module 9—Building Architectural Models—of the Design Your Own House tutorial. In this module you will create a 3D house model using the home floor plans you have designed.
This online tutorial is best followed in order. If you are just starting out with your house design, see our tutorial site map to go through the tutorial in order, or to navigate it as it suits you.
Architectural Model Building
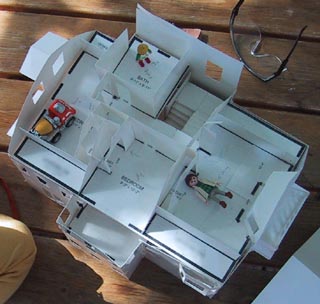
Making a 3D house model can be quite fun. Once you have completed your floor plans it is a fairly simple process. The benefit of having an architectural model of your house design is that you will now be able to visualize how the interior and exterior of the house will really look when finished. It can give you an idea of sight lines as well—what is visible from where inside the house.
To make house models, you will need:
- Several large pieces of bristol board or very heavy weight paper (corrugated cardboard can also be used),
- An architect's scale,
- A utility knife,
- Glue stick or similar paper glue,
- A hot glue gun.
Create the Model Floors
To build your model floors:
Draw all house levels of your floor plans at 1/2":1' scale (to understand more about blueprints and scales see our How to Read Blueprints tutorial).
These drawings can be created with an architect's scale or ruler and a straight edge or using home design software.
- Glue each house level of the floor plans onto bristol board.
Cut the bristol board along the outer perimeter of each floor level with a utility knife.
For a split-level house or a house with changes in flooring height on a single level (for example, a sunken living room or an alcove with a raised floor), consider each split level or floor height change as a separate house level and cut it out.
Interior Walls

Starting with your lowest house level, for each interior wall:
Calculate the height difference from the floor level to the next floor level. In other words include the thickness of the floor joists.
For example, if the actual height of the wall from floor to ceiling will be nine feet and the floor joists will be about a foot, the total height is 10 feet. If you are using a 1/2":1' scale, this height difference for the 3D house model will be 5 inches.
With a ruler, measure the horizontal length of the wall on your floor plan.
Cut out a rectangular piece of bristol board for the wall with the same wall length you measured and the scaled wall height (really the height difference between floor levels).
If this interior wall will have any openings in it (doorways, etc.), determine their measurements for the model and cut them out.
For doors, you can just cut the top and opening side and fold the door open or you can simply cut the door right out.
Using a hot glue gun tack this wall in place to the floor with a dot of glue (you don't need much). It may flop over a bit until you have an adjacent wall to glue to it.
Repeat this for each interior wall for this level, tacking adjacent walls together with a couple of dots from the glue gun where they meet.
If you have any raised floor levels on this level, make several small posts the height that the floor will be raised on your model (a real floor level rise of two feet will translate to an inch on a 1/2":1' scale model). These posts can be made out of any small objects such as toothpicks.
Glue several of these posts to the floor of the house model and then glue the raised floor you have created on the bristol board on top of these posts.
You may have to trim the edges of the floor a bit before placing it to make it fit within the interior walls.
You should now have all the interior walls for the lowest level in your model.
Building Additional Levels to Your 3D Model

For each additional home level:
First repeat the process above for building the next level's interior walls.
Then place the next level onto the tops of the interior walls of the level below. It is best not to glue this floor in place since this way you can still lift it out to view the lower level.
In the interior of your model, your ceiling heights will be scaled higher than your real interior walls because the floor joists have been taken into account. However, if you don't do it this way the exterior of your house will not be scaled correctly. The overall model will be lower than it should be and this will affect the perception of your design.
If you want to be really accurate you can cut out two copies of each floor level, then install one copy of the floor level as a ceiling and the next, on top of adequately sized posts, as the actual floor level. If you choose this method, all interior walls should be measured without the floor joist height added.
Now before you build the roof, you'll need to put on the exterior walls.
Exterior Walls

Your exterior walls will probably bump out and in here and there. In some places you may have a wall that runs right from the ground all the way to where it meets the underside of the roof. In others it may run only the height of one level.
We will consider each part of a wall that stays in the same plane as a single section.
For each section of exterior wall:
On your model, measure its height and width.
Cut out a piece of bristol board to these measurements.
Glue the section of wall onto the outside of the house model with the hot glue gun.
Note: You will have to have designed your roof angles first before you can make any of the model's exterior walls which touch the lower edge of the roof.
Roof

The final step is to measure and cut out roof pieces.
The nice thing about having the whole model put together by hot glue is that once you have the whole model together and you want to start fiddling around with changes, it's easy with a touch of the hot tip of the glue gun to release a roof or wall section and then change the size (or angle) of that roof or wall.
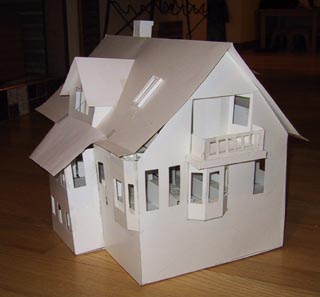
Below is the built house. You can see we changed a few things after making the model. The most noticeable change is that the two bumpouts visible in this view went from having angled exterior walls to square cornered walls.

The land slopes down sharply behind and below the front deck; the basement is above ground on this other side of the deck.
Simple as it is, this model helped us immeasurably when we were deciding on window shapes and sizes, skylight placement, roof angles, and many more house design elements.
Next Module—Make Your Own Blueprint
After you've cycled through all the house design phases and you have finalized your sketches, it will be time to create your working drawings.
Next tutorial section:
Module 10—Make Your Own Blueprint

